
On June 1, I added my first reef inhabitants to the aquarium. I added a couple of recently propagated hairy mushrooms, a leather toadstool, and a finger leather. If you look closely, you can see a leather toadstool attached to one of the Aragorock arches. The green stuff that you see on the bottom of the aquarium is seaweed for my Sohol tang. I have been experimenting with this seaweed for the last couple of weeks now to see if my Sohol maintains his vibrant colors. He absolutely loves this seaweed and devours his entire portion within in a couple of hours. My yellow tank also seems to love this seaweed. If the fish remain healthy, I will let you know where you can pick up some of this stuff for yourself.
Recently, I purchased an ETS Reef Devil downdraft skimmer that I will be adding to the aquarium sump over the next couple of weeks. I quit using skimmers on all of my aquariums a couple of months ago but returned to skimming after having a conversation with Bob Stark, owner of ESV Company. He told me that protein skimmers help to ensure that your dissolved oxygen levels within the aquarium are adequate. At the time that he told me this, my yellow star polyps were doing terrible and I could not figure out why. After starting up my protein skimmer again, they came back to live and are now thriving. Thanks Bob for the advice.
The reason that I stopped using a protein skimmer was that I had been over skimming my aquarium and certain reef inhabitants were doing terrible. When I stopped using the skimmer, they came back to life and started to thrive for a period of time and then started to decline again. My guess is that at the time, I was skimming out nutrients that the reef inhabitants needed in order to thrive and when I stopped skimming, they had an adequate supply of food which is probably what made them come back to life. After a while though, fish waste and other toxins began to build up in the aquarium. I believe this is what caused my reef inhabitants to suffer once again. Once I started up the skimmer again, my theory is that I started to skim out the toxins but leave enough nutrients in the aquarium for my reef inhabitants to feed on Since adding the skimmer back to the aquarium, I am now only moderately skimming the aquarium. This means that I am setting the aquarium flow valve so that the water within the main skimmer column is between ˝ to ľ full (depending on the skimmer that I am using at the time). Since I added back the skimmer and am only moderately skimming my aquarium, all of my inhabitants are doing great.
Recently (April, 99), I made the decision that I wanted a new, bigger reef aquarium in which to keep both hard and soft corals. I had set aside in my mind how much I wanted to spend and based on cost, figured that I would probably go with either a 55 or 90 gallon aquarium. I did not even consider as 75 gallon aquarium as it is too shallow to house some of my soft corals. I went to my local fish store and when I first walked in, noticed a used 60 gallon Amiracle acrylic aquarium sitting in the showroom. I immediately got very excited and asked the store owner what the deal was with the aquarium. He said that it was for sale and said that he would be willing to part with it for $100.00. This included the acrylic stand and canopy. As soon as I gained my composure, I told him to “wrap it up”. The tank was in excellent condition (no noticeable scratches) and he even helped me load the aquarium into my car. The only downfall with the purchase was that the tank was not “reef ready”. No big deal I said to myself, I figure out a way to attach an overflow and run it into a sump.
I brought the aquarium home and put the tank on top of its stand. Once this was done, I needed to decide how I was going to plumb the aquarium. The aquarium came with 2 return ports which was very nice and made my thought process a little easier. My fist decision was to decide on what type of return pump I wanted to use within my refugium. I decided to use a 15 gallon AGA aquarium as a refugium in which I would grow mangroves in to help keep my nitrate level non-existent. Since I will be needing strong water circulation, I decided on a RIO 2100 submersible powerhead.
Now that I figured out how I was going to return water from the refugium, I now needed to figure out how I was going to deliver water to the refugium. I decided that since the tank did not come with it’s own overflow, I was going to construct one.
I could have used plumbing device to prevent this from happening but by keeping this setup, I would not be surfacing skimming the top of the water which would be doing my aquarium an injustice. To plug the bulkheads, I cut two pieces of acrylic slightly larger than than the bulkheads and glued the acrylic to the bulkheads using Weld On 16. To ensure that the bulkheads were sealed, I used Goop Marine Adhesive and Sealant to plug up the bulkheads along with surrounding the acrylic with this stuff. Goop Marine Adhesive and Sealant is extremely durable and as such I have not had any problems with these bulkheads leaking.
I have not yet decided what type of lighting would be sufficient for this setup but post an updated picture once the refugium is in place.
Refugiums are a great additon to a reef aquarium. They help to support the biogolical diversity necessary in order for your artificial reef to survive.
After careful thought, I decided that I was going to construct a 8”L x 6” W x 6”H overflow and mount it in the back center of the aquarium at the top. I decided not to use an overflow that ran to the bottom of the aquarium since it takes up space in which reef inhabitants could be populating.
I used a T – square in which to mark my lines when cutting the acrylic so that I would ensure that my cuts were straight. I then cut the necessary pieces for the overflow and glued them together with the Weld On 16. I made sure to let the glue dry before taking off the scratch protecting paper. The glue cured very fast and in a few hours, was ready to begin to make the drainage holes in the overflow.
To make the drainage holes in the overflow, I used a soldering iron and melted indents into the top front of the overflow. In retrospect, I should have used a drill bit designed for acrylic but did not have one handy and did not feel like waiting to purchase one. My feeling was that it would not be that noticeable once water was in the aquarium. Once the drainage holes were carved into the overflow, I mounted the overflow in the back center of the aquarium at the top using an adhesive/sealant made by a company called Goop called Marine Adhesive/Sealant. Let me tell you that this adhesive/sealant bonds very well to acrylic, glass, and wood. It cures a lot slower (within 3 hours) than one would like however, it is as strong as nails and does an excellent job of sealing just about anything .
Once the glue cured, I drilled a hole in the back of the aquarium and fastened a bulkhead within the overflow in order to draw water from the overflow. I plumbed the overflow using ľ OD pvc pipe which runs from the overflows bulkhead into my 15 gallon sump. I placed a ľ OD 90 on the end of the pvc which runs into my sump in order to control the water flow within the sump. Over time, debris starts to accumulate within the sump and I can rid the sump of this debris by directing the water flow towards it.
If necessary, I can completely drain the water (or anything else that is residing on the bottom of my aquarium) from the bottom aquarium. I plug this drain using a ľ inch pvc cap.
Plenum drains have become popular lately. If I need to drain the bottom of my aquarium, I will use a powerhead with a piece of flexible tubing attached to it and drain the water into a plastic bucket. I will do this, if necessary, in conjunction with my monthly water change to ensure that I am not changing too much water at any one time.
Now that the reef was in place, it was time to set up my lighting. For this aquarium, I will be using two 175 watt, 5500K metal halide lights and two 110 watt attinic 03 VHO striplights. I purchased the metal halide lamps and ballasts from ALS Lighting Supply and the VHO striplights from That Fish Place. As for the VHO ballast, I purchased this at a Brooklyn Aquarium Society auction for $42.00 (doesn’t that make you sick). As for the hood, I purchased it used at a local aquarium store for $150.00 complete with metal halide moguls and fans. It also came with lights and ballast however, since I already purchased new lights and ballasts, I chose to use the new ones on this aquarium and use the older ballasts on a coral cuttings tank that I will soon be constructing. As for the lights that came with the hood, I thew them away because they looked as if they were used for a period of time and was afraid that the spectrum on these lights had already changed.
Once I finished wiring my new light setup, it was time to hang the lights over the top of the aquarium. Luckily for me, the aquarium came with 5 inch acrylic squares fastened onto the top of the aquarium. Thier purpose was to hold the original canopy in place. I placed my aluminum light canopy on top of the acrylic squares and it holds the canopy in place really nice. My canopy is very light and as such, I am not too woried that I am applying too much weight on the top of the aquarium.
As you can see, I mounted my Icecap 430 VHO ballast on top of the canopy. This was mainly so because I did not want the ballast to get in the way of wiring, pvc pipe, etc. I run both the metal halides and attinic VHO's on separate timers.

Hi and welcome back. As you can see, my 60 gallon reef tank has progressed a lot over the last month. I’ve aqua-scaped the entire aquarium with my very own Aragorock live rock. My fish seem to absolutely love it. When I first added fish to the aquarium, I only had Aragorock base rock that was fully cured and ready to use for the aquarium. My fish would only stay behind or around the base rock and would not venture towards the middle or top of the aquarium (even for food). Once I added the Aragorock caves and arches, toward the middle and top of my aquaqrium, my fish began to swim throughout the entire aquarium. They are a lot easier to view now and I think that it is absolutely stunning to watch these fish swimming throughout the Aragorock caves and arches.
This is a picture of the Reef Devil 40 protein skimmer that I recently purchased from E.T.S. As you can see, it is working great on my 60 gallon reef aquarium. Notice the collection cup. It is filled with dark brown waste. I am running the skimmer with a RIO 2500 submersable powerhead. 
This is a picture of my new 60 gallon tank prior to setting it up. If you look closely, you will notice two black squares on the bottom of the tank. When I purchased the aquarium, it had two bulkhead on the bottom of the tank to be used for drawing water from the tank. I did not want to use these as a way to draw water from the tank because if my pump failed, it would completely drain the water from the tank. 
This is a picture of my 15 gallon sump that I am using for my 60 gallon reef aquarium. This sump is glass aquarium made by AGA. Eventually, I want to turn this sump into a refugium. Upon doing so, I will add lighting to this sump and add such things as macro algae.

To build my aquariums overflow, I purchased a 2’x2’ piece of Ľ “ acrylic (name brand Acrylite) from a local plastics dealer. It cost around $13.00. I also purchased from the plastics dealer an acrylic cutter which cost me $3.00. Finally, I purchased an acrylic adhesive called Weld On 16 in a tube for $5.00 . I then went home and decided on how to construct the overflow. Some of the things that I needed to consider was
This is the picture of the overflow that I built to provide surface skimming for my new 60 gallon reef aquarium. Once I glued the overflow to the back top of the aquarium in the center using Weld On 16, I made sure that the overfow was sealed by using Goop Marine Adhesive and Sealant.

Once my overflow was in place, I started to work on building my live sand filter (plenum). I used egg crate purchased at home depot as my floor. I used ľ inch OD pipe as my elevating mechanism. I cut the pvc pipe into one inch strips and glued the pvc strips to the egg crate using the Weld On 16 (cures in two hours). I cut a hole towards the back of the egg create and glued an 8 in piece of ľ inch pvc pipe in the hole using Weld On 16 glue and sealed the hole with goop marine. This pipe is going to be my drain which I will use periodically to test the water in the bottom of the live sand filter. Once the Weld on 16 and goop marine cured, I placed the egg create within the aquarium and covered the egg create with nylon screen which I purchased at my local home depot. For more detailed information on how to build a live sand filter, please refer to my web page entitled “ “. After the egg crate was completely covered with nylon screen, I used Caribsea aragonite and covered the screen and egg create completely until the aragonite was ˝ inch high. Once this was done, I used nylon screen and completely covered the aragonite gravel. Finally, I covered the nylon screening again with live aragonite gravel again ˝ inch high. My live sand filter was no finished.
This is a picture of my live sand filter commonly referred to as a plenum. As you can see, this pictue show the layers of sand separated by the plastic screen. Note towards the back of the live sand filter the plastic pvc pipe. This is the plenum drain. Periodically I will extract water from the bottom of the plenum using this drain to test the water property at the bottom of my live sand filter.

Once my live sand filter was in place, I filled the tank completely with saltwater (salinity 1.024) and began to run the pumps. I let the tank stand idle for 48 hours before introducing my homemade aragonite rock. (For more information on how to construct your own aragonite rock, please refer to DIY page). All of the rock that I am using in this aquarium is homemade. Made by myself. I chose to use only homemade rock because I formed the rock in a way that would allow for greater water circulation. Sufficient water circulation is extremely important in a reef aquarium. I constructed the reef so that it would touch the live sand bed in only eight places. In addition, the rocks that are piled up on each other only touch one another in a maximum of three places. I seeded the homemade rock in a 20 gallon Rubbermade container for thirty days prior to introducing the rock into the aquarium. Eventually, this rock will be completely covered with both hard and soft corals.
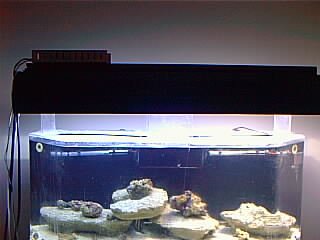
This is a picture of my light canopy suspended over my 60 gallon aquarium. Within the canopy, I am using 2 175 watt 5500 kelvin metal halide bulbs along with two 110 watt VHO attinic 03 striplights. I have a 4 inch fan on one side of the canopy and a vent on the other in order to cool the lights when they are illuminated.
Please e-mail me your comments/feedback on this site