

I made this protein skimmer myself after doing extensive research on how to build an efficient protein skimmer. It is a combination of several different ideas and some of my own. I bought the acrylic piping at a local plastics store and all the plumbing fixtures at a local hardware store. Below is a parts list for this protein skimmer.
Currently, I am powering this skimmer with a RIO 2100 power head which is working well.
This skimmer is working very effeciently on my 37 gallon Reef Aquarium. I'm sure that it would handle larger aquariums in the same fashion.
This is my first attempt at building my own protein skimmer. Prior to construction, I did alot of reading on working with acrylic and asked alot of questions at the plastics store. I feel that this, along with research on the construction of protein skimmers is what made me successful my first time around.
| I spent many hours researching how to build a Proten Skimmer. I used this interior plumbing design for two main reasons. First, by using a plumbing T at the bottom of the intake with two 90 degree elbows facing in the opposite ends of one another, this would ensure that I would get the swirl necessary to effectively carry unwanted particles to the top of the skimmer. | 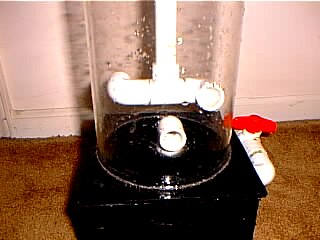 |
Second, notice how the return pipe is located about 2 inched below the end of the intake piping. This was to ensure that I did not get any bubbles to return back into my sump and the back into the aqaurium itself. I have found over time that one of the biggest hurdles with any Protein Skimmer is to prevent excess bubbles from entering the aquarium. The methodology behind this Protein Skimmer solves this common problem.
| This is a picture of the protein skimmer in action. As you can see, this protein skimmer WORKS. This cost me about $50.00 to build. If you were to purchase a skimmer like this, you could expect to spend around $175.00. | 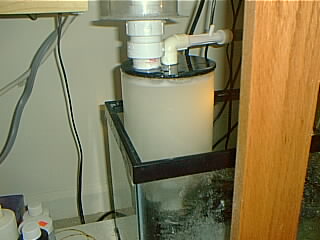 |
Look through your local yellow pages for a plastics dealer. Call them to first to find out whether the sell acrylic tubing. I spent $30.00 for a 3 foot piece of 6 inch OD acrylic tubeing 1/4 inch thick. If I were to build 3 skimmers, my cost per skimmer would decrease greatly since I could allocate the cost of the acrylic tubing over three skimmers (the acrylic tubeing was by far the most expensive item in the parts list).
Unlike comparable skimmers which are made out of inferior plastic, this skimmer is made out of 1/4 inch acrylic which is extremely sturdy. I made sure that I used extra Weld On 16 adhesive to ensure that, over time, parts would not come apart (like some skimmers).
I am running this skimmer in a 15 gallon sump. I attached a 90 degree elbow to end of the skimmers return in order to direct the water flow from the skimmer to areas where debris may be collecting within the sump in order for the skimmer to collect the debris
As you can see, this venturi skimmer collects alot of waste. I cleaned the collection cup only 18 hours ago and already this skimmer is producing thick brown goo. I am running this skimmer with a Rio 2100 powerhead. 
Please e-mail me your comments/feedback on this site